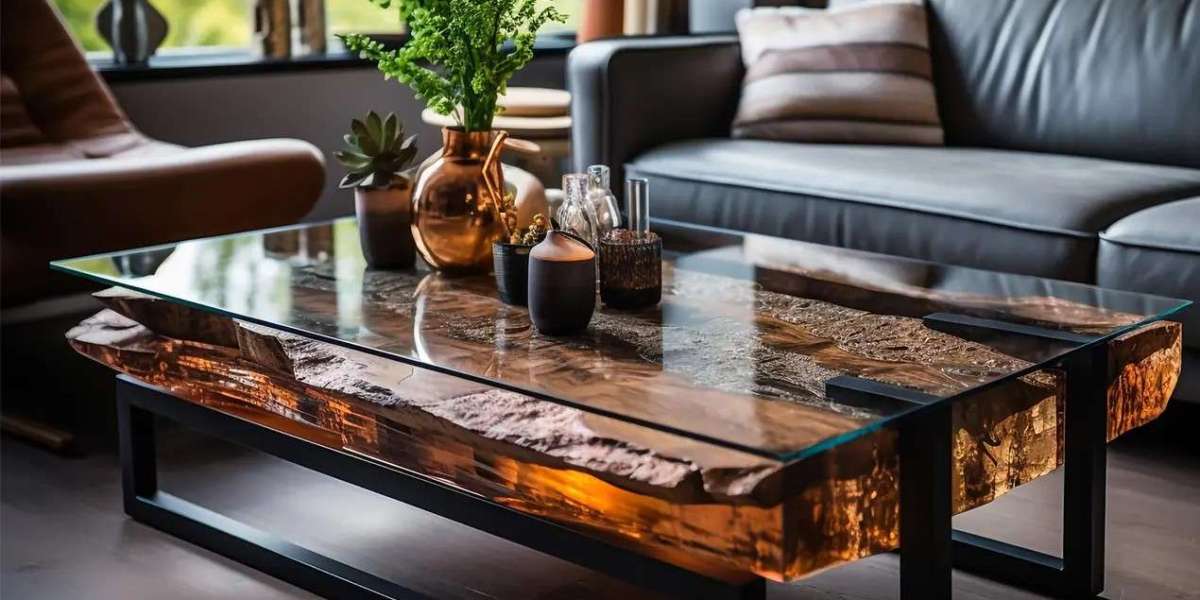
Creating a unique and eye-catching centerpiece for your living room doesn't require a trip to an expensive furniture store. With a bit of craftsmanship and creativity, you can build your own epoxy resin solid wood coffee table that showcases the beauty of natural wood and the artistic flair of epoxy resin. This DIY epoxy resin wood table guide will walk you through each step, from selecting the right materials to pouring resin and finishing your masterpiece.
Choosing the Perfect Wood Slab
The foundation of your table's beauty lies in the wood you choose. A solid wood slab with unique grain patterns or natural imperfections can elevate your design.
Best Wood Types for Epoxy Resin Tables
Walnut: Known for its dark, rich color and fine grain.
Maple: Offers a lighter tone with striking grain patterns.
Redwood: Ideal for rustic aesthetics due to its warm hues.
Live Edge Wood: Keeps the natural contours of the tree for added character.
Pro Tip
Ensure the wood slab is dry and free from pests or rot. Kiln-dried wood is ideal for stability and durability.
Preparing the Wood Surface
Before pouring the epoxy resin, it's crucial to prepare the wood properly to ensure a smooth and lasting finish.
Steps to Prepare Your Wood
Clean the Surface: Remove dirt, dust, and oils using a damp cloth.
Sand the Wood: Start with coarse-grit sandpaper and gradually move to finer grits for a smooth finish.
Fill Cracks and Voids: Apply wood filler to any large gaps or imperfections that might affect the resin pour.
Seal the Wood: Use a clear epoxy seal coat to prevent air bubbles during the final pour.
Designing Your Epoxy Resin Wood Coffee Table
The design phase allows you to get creative and plan the final look of your table.
Creative Design Ideas
River Table: Create a "river" of colored resin between two wood slabs.
Galaxy Effect: Use deep blues and metallic pigments to mimic the night sky.
Natural Embedding: Incorporate stones, shells, or dried flowers for a nature-inspired design.
Geode Design: Mimic the appearance of shimmering geodes with glitter and metallic resin.
Color Selection
Choose colors that complement your home décor. Pigments can range from clear and subtle hues to bold and vibrant tones.
Building a Mold for the Resin Pour
A mold is essential to contain the resin during the pouring process and ensure a smooth, even surface.
How to Build the Mold
Use melamine or HDPE boards for the mold, as resin won't stick to these surfaces.
Seal the edges with silicone caulk to prevent leaks.
Apply a release agent to the mold surface for easy removal.
Pouring the Epoxy Resin
This step requires precision and patience to achieve a flawless finish.
Step-by-Step Pouring Process
Mix the Resin and Hardener: Follow the manufacturer's instructions for the correct ratio. Mix thoroughly to avoid bubbles.
Add Pigments: Stir in color pigments or metallic powders to achieve your desired effect.
First Layer: Pour a thin base layer and let it cure partially to reduce bubbles.
Final Pour: Slowly pour the remaining resin, ensuring an even spread.
Bubble Removal: Use a heat gun or torch to remove air bubbles from the surface.
Safety Precautions
Work in a well-ventilated area.
Wear gloves, goggles, and a respirator mask to protect yourself from fumes.
Curing the Epoxy Resin
Curing is a critical step to ensure the durability and clarity of your resin table.
Tips for Proper Curing
Follow the manufacturer's recommended curing time and temperature.
Keep the table covered to prevent dust from settling on the surface.
Avoid moving or disturbing the table during curing.
Sanding and Polishing for a Flawless Finish
Once the resin has cured, sanding and polishing will give your table a professional, glass-like finish.
Sanding Steps
Start with 120-grit sandpaper and gradually move up to 1500-grit for a smooth surface.
Wet sanding is recommended to reduce dust and achieve better results.
Polishing Tips
Use a polishing compound and a buffing pad to achieve a high-gloss finish.
Apply a protective wax for added shine and durability.
Attaching the Table Legs
The final step is to attach sturdy and stylish legs to your epoxy resin wood coffee tables.
Leg Options
Metal Legs: Ideal for modern or industrial designs.
Wooden Legs: Complement rustic or traditional aesthetics.
Hairpin Legs: Offer a sleek and minimalist look.
Installation Tips
Measure and mark leg placement accurately.
Use durable screws and brackets for secure attachment.
Maintenance Tips for Long-Lasting Beauty
To keep your best online shopping store looking stunning, regular maintenance is essential.
Care Tips
Clean Gently: Wipe with a soft, damp cloth to remove dust and spills.
Avoid Abrasive Cleaners: Stick to mild soap and water for cleaning.
Protect from Heat: Use coasters or heat-resistant mats to prevent damage.
Why Building an Epoxy Resin Wood Coffee Table is Worth It
Creating your own epoxy resin wood coffee table offers numerous benefits:
Customization: Tailor the design to your personal style and home décor.
Unique Craftsmanship: No two tables are alike, making yours a one-of-a-kind masterpiece.
Creative Satisfaction: Experience the joy of building a functional piece of art with your own hands.
Read Also: 5 Shocking Epoxy Resin Wood Coffee
Conclusion
By following this DIY epoxy resin wood table guide, you can create a stunning coffee table that will undoubtedly become the talk of your home. From selecting the perfect wood slab to pouring resin and polishing the final product, each step offers an opportunity to craft a unique and beautiful piece of furniture. Whether you're a seasoned craftsman or a DIY enthusiast, this project will bring creativity and functionality to your living space.